Powershell and using the Jenkins Job Builder
Introduction
This is a blog post on how I was able to get Jenkins with the Jenkins Job Builder (JJB) to start running Powershell scripts on a remote Windows machine. Doing research into this project, it seems there were all the pieces of this possible layout, but no tutorial. This is my attempt to make this tutorial, and any gotchas I had, happen.
My ultimate goal here is to create a Jenkins pipeline that takes Chef Automate and creates a vApp out of it. I’m only going to focus on building the Jenkins portion in this post.

As you can see from this layout, I still leverage a Ubuntu 16.04 box for the Jenkins server, a remote git repository for the storage of the JJB files, and two slaves for executors. If you follow the chart left to right, you should see the workflow I have created.
Any Powershell jobs runs on the Windows machine, and any Bash based jobs should run on the Ubuntu machine.
So lets get started!
Build the Jenkins master box
The first thing you need to do is create a machine that can run both Jenkins and the JJB. Luckily I have already created a blog post on how to bootstrap this process. I leverage the Chef cookbook and do some local installation of applications for the JJB. (I swear I’ll write a cookbook to automate this at some point, but it’s not too bad.) Go ahead and go here to start if you don’t have it set up already.
You’ll need to add the Powershell plugin to ship off the Powershell commands. Go ahead and do that now.
Building the Windows slave
The first thing you should do is get the version of Powershell you want to run. I’m attempting to learn Powershell so I went ahead with the newest release. You should double check Powershell version compatibility with the version of Windows you’re running too.
After getting Powershell installed, you’ll need to install Java. It’s the easiest way to get the Jenkins service running on the machine; I chose Oracle Java, mainly because it was easy and gets the job done. (We can debate the licensing and all over :beers: if you ever want to.)
With this, you should have all of the dependencies required for a Windows Jenkins slave. I have a plan to create a Windows based cookbook to automate these two installations, but like the JJB cookbook, I just haven’t had the time to make it.
Add node to the master
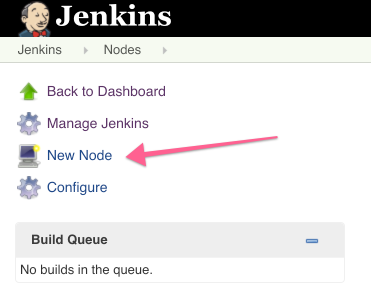
The next step is to make the Master know about the new node. This is done via logging in with
an account with admin rights then clicking on Manage Jenkins > Manage Node and the following
link.
Fill in the first bit of the information, for instance Name of “windows-node” or the like,
then click the Permanent Agent radio button and OK.
Then fill something out like the following:
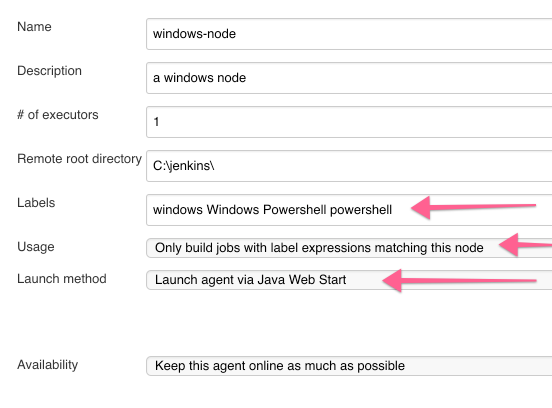
The ones with the arrows are the most important to take note of. The “Labels” section is how
we make sure the JJB sends the correct job to the correct executor. You can put whatever you want
here, but from the templates I have, you’ll see that the powershell as the label. Notice also
the spaces between the labels, this is intentional, commas make Jenkins sad it seems.
The next two arrows are also important to set, the Usage section verifies that the label is what you declare. The other option if not changed to the one suggested, you might run Powershell on the Ubuntu machine! The final arrow, makes sure that you have the Launch button for your Windows slave. If it isn’t there go to this stackoverflow to fix the problem. It seems by default it’s not enabled, so keep that in mind.
If you’d like to set up a Ubuntu slave node, you can follow these same steps but s/Powershell/bash/
and s/Windows/Ubuntu/ should get you there too. I’m not going to type it all out but if you have
problems don’t hesitate to reach out to me via twitter.
Connect the Windows machine to the master
Now that everything is setup, you can now log into your Windows machine and go to your Jenkins instance
http://<jenkins>/computer/windows-node/ and find the Launch button, like the following.
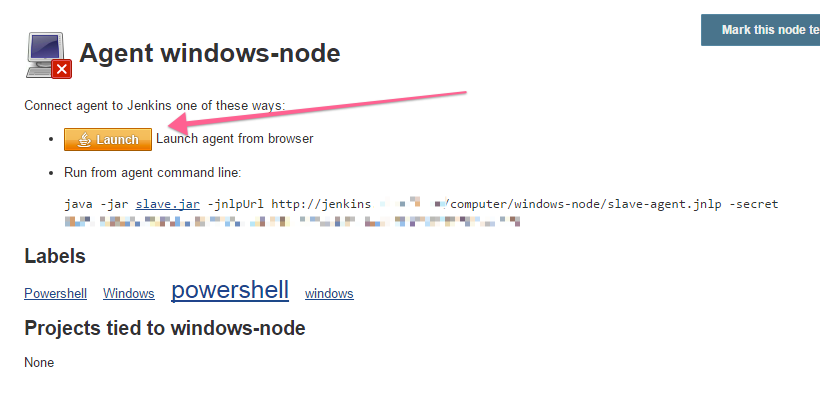
You should see some Java-y things pop up, accept and run them. It’ll install the required application,
then you can install as a service if you like. File > Install as a service.
Congrats, everything should be should be wired up now. Now lets try to run some jobs.
Template Jenkins Jobs
The first thing I do when building a new Jenkins machine ran via the JJB, is I set up something called
update-jobs. It’s a basic job that watches a git repo, (in my case github), and then runs the jenkins-job-builder
application when changes are made.
Here is a basic template that I use, you’ll need to edit for changes in your environment.
- job:
    name: update-jobs
    project-type: freestyle
    description: 'automagically update the jjb jobs!'
    properties:
      - github:
          url: https://github.com/jjasghar/jjb_repo
    scm:
      - git:
         url: git@github.com:jjasghar/jjb_repo.git
         wipe-workspace: false
         clean: true
    builders:
      - shell: |
          #!/bin/bash
          jenkins-jobs --conf jenkins_jobs.ini update jobs/
    wrappers:
      - workspace-cleanup
      - release:
          keep-forever: false
      - ansicolor
    triggers:
      - github
As you can see it’s pretty straightforward, and if you give your user(s) access you can even use private repos!
Now when you make changes to your repo and push, you can either Build Now or even link up the
webhooks to update your jobs. Pretty slick.
bash
Here is a bash template job, to make sure that everything is wired up. It’s pretty straightforward too.
- job:
    name: 'Basic bash example'
    project-type: freestyle
    description: 'A basic example of a `jjb` job that echoes "Hello world" and cats out /etc/password'
    builders:
        - shell: |
            echo 'Hello world!'
            cat /etc/passwd
Powershell
Here is a powershell template, go ahead and add this to your repo and push both up. This will be a good
verification. Take note of the node: 'powershell' line, this is the Labels I was talking about earlier,
you can have anything there, this is just what I defaulted to.
- job:
    name: 'Basic powershell example'
    project-type: freestyle
    description: 'A basic example of a `jjb` job that leverages powershell'
    node: 'powershell'
    builders:
      - powershell: |
          try
          {
            $PSVersionTable.PSVersion
            get-host
          }
          catch
          {
            write-host "Caught an exception"
            exit 1
          }
Run the builds!
So if you have these three templates up, and you have the jobs created, you should be able to test now. Your bash job should go to your bash executor, and your Powershell should go to your Windows machine. You should see the outputs in your console logs too.
Conclusion
I hope this provides a coherent basic walkthrough (or helped) to setting up a Distributed Jenkins build with both bash and Powershell.
Like I said at the beginning, I’m working on getting PowerCLI working so I can automatically
create vApps, so ideally it’ll build off of this.
If you found this useful, please tweet at me, I’d love to make this better or fill in any gaps I might have forgotten!
Thanks!